Sunday, May 29, 2022

Hands2Help Quilts

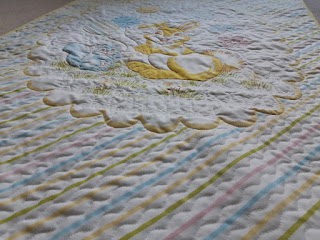
I am joining the Hands2Help parade and am sneaking in under the wire. I just put the last stitches in the binding and took the pictures :).

One of my goals is to use up some of the fabric I have inherited from various sources. Some of it is definitely easier to use than others :D. For the Hands2Help challenge, I chose to use a panel that I had. It seems like it's an old one, but it's also timeless.

I started by stitching a serpentine stitch down the length of each line. I got the idea from other blogs that I read, and was really happy with how this came together. The only tricky part was when I got to the middle I would have to remember to switch to my regular stitch so I could follow the design along to the next line to go down (I didn't want to have to deal with all those loose ends).

The next thing I did was trace around the scalloped border on the inside. I did this with my regular stitch because I didn't quite trust my ability to do it as free motion quilting.


After that I switched to free motion quilting. I added some grass at the bottom. I'm not good at straight lines, so I drew lines straight across to help me know where I was going. I also didn't want lots of ends to tie in from this so I worked left to right the first row, then moved up and worked right to left. I found that direction harder when I was practicing, so I actually turned the quilt upside down and worked that was instead.


I also traced around all the animals and balloons, and added some clouds to the sky to help fill things in.


I was really happy with the back I found to go with it (also an inherited fabric). Especially since the lines on the front were yellow, pink, green and blue, and the backing fabric was yellow with pink, green, and blue circles on it.


I bound it with a yellow binding, which looks great. This was a bit of a tough one to square up (some of the dangers of inherited fabrics).


This quilt will be going to Project Linus to hopefully make someone happy. I will also be donating two quilts I finished a number of years ago, but that just haven't found their way out of my house yet:


Thursday, May 12, 2022

Catching Up on Christmas: Part 3


The final thing left on my Christmas catch up are the gifts I made for my brother. Quite a while ago, I purchased a couple panels of Canadian cities, knowing that I wanted to make something for my brother out of them, but not knowing what. One thing that had crossed my mind was seat cushions, so when he asked me to make him a seat cushion in the fall, I knew it was time to dig out the panels.


I had also bought some fabric with the provinces listed on it to go with whatever I had decided to do with the panels. I don't have a close up shot of that to show here. I thought I only had a little, so I used it sparingly, and then it turned out I had more than I thought, so I could have used more (especially because I don't have another plan for it)


I made an envelope-style cover, with ribbon ties coming out the two back corners. I then wrapped some foam in batting and stuffed it inside. 


I put them together in a couple groups. Quebec (above)/Ontario(below) were one set.


Then I did  a set of four that contained western cities on one side...


And eastern cities on the other.


I had a few too many panels, so I saved the west-coast ones for another project.


He also needed a new mask (since the one I threw together 2 years ago for use for a few weeks had been well worn). This year, he got season's tickets to see the Kitchener Rangers play (when we could do things in person), so I made him a mask to wear to the games.


I think I have now caught up on posting about last year's Christmas gifts. It's probably time to start working on this year's gifts :D.

Tuesday, May 10, 2022

Christmas Catch Up Part 2: Just What You've Been Weighting For

For Christmas, I gave my mother a box with some fabric, some weighted pellets, and a note that said "sewing included".

I knew she wanted a special size of weighted blanket, but I wasn't sure exactly how heavy she wanted it or what size she wanted, so I thought it was best to confirm these things before I put the work in.

For anyone interested in making a weighted blanket, let me just say that, in my experience (as is the case with many homemade things), it certainly didn't save me any money to make it myself. I went back to Michael's on a regular basis to buy one bag of pellets at a time. Which was difficult because there were a number of bags that had ill-formed pellets that I didn't want. So I ended up with two very different colours and sizes of pellets.


I also picked up what I think was a cloth shower curtain from the clearance section at Marshall's. It was a really fun print, and a bit bigger of a print than you would generally get on a quilting cotton. Plus, because my mom wanted a smaller blanket, I was able to use the curtain for both the front and the back. And even with all these cost savings, it was still over $60 to make basically a child-sized one and that doesn't include any of my time.

After I had confirmed what size and weight she wanted, and collecting all my bags of pellets, I got to work. Step 1 was to decide on how many sections I was going to split the blanket into and then evenly divide the pellets across the blanket.


I borrowed my friend's kitchen scale and (after some quick math), measured out the pellets. I ended up having 70 squares in my blanket, which meant I needed 70 different containers to house everything. Good thing I had been saving sour cream containers over covid :D. 


It was also a good thing I had borrowed my friend's scale and not just tried to do it by volume, since it turned out my pellets were very different sizes (even though they were all the same brand). This meant I had some squares that were far more full than others. 


I left an edge around the outside of the blanket by stitching about 2" in from the 2 sides and the bottom. I then marked and marked and marked - it was a lot of marking. I made my squares 4", and I didn't want to draw full lines because I wasn't sure about getting them out when I was done, so I had to put ticks frequently enough so I could know where to stitch.


I sewed channels down each column so that they were stitched all the way from the bottom to the top. Then I went along and dumped one container's worth of pellets into each channel. I used a paper rolled into a wrapping paper tube at first to help guide the pellets to the bottom. I also then pinned down the fabric above the pellets to help hold them in place once I moved it around to send it through the machine. This was especially important in the squares that had a higher volume of pellets in them. 


I stitched straight from one side to the other to close off a row, and then would start all over again, shoving pellets down channels. It's certainly not a hard project, but I will say it got tougher the fuller the blanket got, since it was getting more and more heavy and pulling as I was sewing. Eventually everything was full and I closed off the top. Then it was time to pick a binding. I had decided to bind it so that I could just stitch straight from one side to the other every time and not worry about how the end was looking from doing some reverse stitching.


In the end, I decided on the grey binding. I was really happy with how it turned out, and my mom seems happy with the end result.


On a side note, I had considered a weighted blanket for myself, and did try out the one I made my mother for a couple nights before I was able to give it to her, but hadn't thought more about it. Then the other night when I was at the store, they had one in clearance about the size and weight I probably would have made for myself for a lot cheaper than I could have made for myself, so I decided to go for it. However, I had walked to store, which meant I was walking my new 12 lb blanket home with me. It came in a box with a handle, so wasn't too bad to carry, but I sure would have preferred if I could have carried it as 6 lbs on either side :D.

Sunday, May 8, 2022

Catching Up on Christmas

Next up on my backlog is posting about projects I made for Christmas.

Don't let this post deceive you, they were done before Christmas, I just didn't post about them.

Some time last year, I hemmed a curtain for my friend to use across her under-the-stairs storage. When she wasn't looking, I snuck the cut-off home with me to use at a later date. I decided Christmas was that later date.

She just finished a basement upgrade (well her dad just finished it) and so I decided she could use some cushions for her new living area to match her curtain. The fabric sides were inverse of each other (dark with light branches and light with dark branches), so I decided to take advantage of that and utilize both sides.

I also decided to add a ruched bit in the middle. (I originally saw this idea in a magazine I got for Christmas one year, though when I wanted to confirm the length of fabric I might want to use, I could not for the life of me find the magazine).

One thing I will say is that this fabric really had a life of its own - and staying square wasn't high on it's priority list. So to make my life a little easier, I used freezer paper on the back of the fabric until I was done attaching it to everything, and that really helped.

Another thing I added was pipping. The Seasoned Homemaker has my go-to pipping tutorial. I have used it a countless number of times.

I didn't have enough fabric for all of that out of what was left from the curtain, so I used some grey cotton from my stash for the ruching and pipping. I went with a darker pipping and lighter ruching on with the dark side of the fabric, and a lighter pipping and darker ruching for the lighter side of the fabric.


With the ruching, the pipping, and the curtain fabric, I think they came out looking very professional, and not at all like a homemade pillow.

For the same friend, I also utilized some new skills on my Cricut. I had bought some wooden coasters and wanted to jazz them up. She always has so many lovely plants in her home, so I decided I would go with that for a theme.

Test run in vinyl on paper

I found some designs I liked, cut them out of iron-on vinyl, and attached them to the wooden coasters. That's the white-washed version of how things went (and how I planned it, because you know, I watched a 5 min youtube video). In reality, I started too late, didn't have everything planned, and was trying something completely new. So I was in my craft room at 10 PM the day before Christmas Eve (when I was leaving at lunch the next day and hadn't packed yet), freaking out because nothing was working.

A couple things I learned: First, not all wooden things are created equal. Part of the problem was that my surface wasn't smooth enough. Thankfully I had some sandpaper that I could take to it, and after sanding it down for a while, it went much better. Second, small pieces are trickier. Originally I was going to just do the outline, but there wasn't really enough there to stick down. Even as is, with the transfer tape on top of it some of those pieces just didn't want to stick and I had to go with the iron straight on it (but not for too long or that was also a problem).


Did I have to cut the first one out multiple times because I ruined it trying to attach it? Yes. Did I have to glue felt to the bottom because I ruined one side of one of them and had to turn it over and use the other side? Yes. But, overall am I happy with them? Yes. 

While we're talking Cricut projects, I'll also show you the card I printed for my Dad to tell him we helped kickstart a new season of Mystery Science Theatre 3000 on his behalf (it's a nerd thing).


Apparently I didn't take a picture of the finished product, just the plan. The finished product basically looked like this :D. 

Tune in next time for more "Things I made at Christmas, but am only posting about now" :).

Friday, April 22, 2022

Wonderful World of Colour

I had very different plans for the Wonderful World of Colour blog hop. I was through one project and half way through the other when a new idea struck me. Perhaps some of you can relate.

On Friday night, April 15th, I was watching the Blue Jays baseball game while working on my Wonderful World of Colour project. For those who don't know, April 15th was Jackie Robinson Day: the 75th anniversary of Jackie Robinson breaking the colour barrier in Major League Baseball by becoming the first African-American player in the league. It was also just the previous week that America confirmed Ketanji Brown Jackson as the first Black woman on its Supreme Court. These events got me thinking about a piece that I finished a few weeks ago but hadn't yet had the opportunity to post about.

Last year, I had an opportunity through work to participate in an online course called Confronting Anti-Black Racism. I found it to be a very powerful experience. One of the things we did each week was write a reflection, but I am not really a words person so I had a hard time putting my thoughts into words. So, I also reflected through fabric.

As I sat in my craft room late on a Friday night, throwing around bright and fun and colourful rainbow scraps, and listening to baseball and just having a good time in general, I thought about the Blue Jays home run jacket meant to honour the diversity of the team (it's a great story if you don't know about it), and I thought about Jackie Robinson and the difficulty he went through trying to be a major leaguer, and I thought about the words "Wonderful World of Colour" and I knew what this post needed to be about. We live in a world that is full of so many wonderful people of so many different backgrounds and skin colours. And so, in my Wonderful World of Colour blog hop post, I want to share my reflection piece to celebrate the wonderful world of colour that we live in and all the things that are happening to help make it a better place for the future.

I would like to add a couple of disclaimers about this post before I continue:

  1. I am a white Canadian woman who comes from a settler background, and as such I have had opportunities in life that have not been available equally to everyone. (Not sure if you caught the Canadian through my spelling of colour and my watching of the Toronto Blue Jays :D.)
  2. This is a personal reflection piece on a personal journey of reading and learning, which I am still undertaking. I won't be able to adequately explain all of my decisions and you may not agree with everything I've said or done. That's okay.

Here is a view of the entire reflection piece. I mostly worked in whites, browns and blacks. But I did add in some pink to represent gender and some green to represent economic status, as those ideas also shape identity and came up as additional themes in the books I was reading.


There were a few main themes to the blocks I made that I will discuss below.

Inequality

These two blocks represent the fact that our society was built on the backs of black people. The first one also shows the (hopefully) historic hierarchy from darkest to lightest skin.


Diversity

In these first two blocks I wanted to show the spectrum of colours that people come in.


This third block was to represent the concepts of segregation and integration.


The last block in this section was my representation of the idea of trying to fit a square peg into a round hole. When we try to paint certain groups of people with broad brush strokes and fit them into a single identity, we miss the diversity and value that each individual brings.


Identity: Framing and Perspective

Identity is such a personal thing that is so influenced by outside forces.

This first block is to represent how we frame our identities. Sometimes we see our colour or culture or nationality as the core of who we are with our gender and economic status radiating out from there. Sometimes our gender or economic status is core with our race surrounding that. It's different for every person and it's different for the same person at different stages of life or in different interactions. Our background and our experiences shape how we see ourselves and those around us. 


This second block shows that how something is framed or the light that something is viewed in affects how we see it. Surrounded by the white frame, the brown center is dark, but surrounded by the black frame it is white. I think we quilters understand quite well that the fabrics we pair something with affects the colour it appears to be or which pieces of it really get pulled out/highlighted.

The third block represents the intersection of the different parts of our life: gender, status, colour, background, etc. They all swirl together to make us who we are. They are distinct but joined together.


These next two blocks really represent perspective. Although they look to be spirals, they are quilted entirely with straight lines. That's another reason I chose to use the snail's trail pattern in the block above because of the perspective of all of these straight lines coming together to create a swirling effect. Understanding that everyone is coming to the table with different experiences and that people's perceptions affect their understandings and their interpretations was a key idea that stood out to me in my readings.


I won't have to explain to the quilter's in the room why I also chose to use the tumbling block pattern. This pattern is all about perspective and completely depends on how you look at it. It is a great reminder that people can look at the same thing and see something completely different, and neither one is wrong.

Hope

I was doing my reading and reflecting right around the 1 year anniversary of the George Floyd murder. I wanted to include something in my piece to be representative of the hurt and the struggle and the injustices that so many have gone through, but I also wanted to speak to the awareness and the momentum that these events inspired, and so I chose to use the fist symbol. It was used before and it will be used in the future, but in my lifetime and my experiences, this really resonates with the murder of George Floyd and the protests that stemmed from this (and so many years of too many similar events).


Conclusion

I know this was probably not what you were expecting when you came to my blog today for the Wonderful World of Colour blog hop, but it was on my heart as being entirely appropriate for this blog hop and needing to be posted, and I hope it gave you some food for thought.

I will end with a few more quilty shots and also say that I know that you are encouraged to post comments to encourage the quilters on the hop, and you are welcome to do so, but that was not the point of me posting this piece as part of the hop. I want the focus of this to be about awareness and reflection and not about my sewing abilities or products. I also know that this can be an intricate and complicated and heavy topic (I know I have felt some heaviness writing this post), so please feel free to just sit with your thoughts instead of commenting if that's what makes sense for you.


I took it out for a glamour shot in the snow the other day.

Don't forget to checkout the other quilters and their work:

Friday April 22

Kathys Kwilts and More

Pieceful Thoughts

Karen's Korner

Inflorescence

Crafts and Math (you are here)

MooseStashQuilting

And Joan has made a lovely pinterest board of everyone's post that's a great summary.

Thanks so much for stopping by and going on this journey with me :). And you can check back in at a  later date to see the other projects I had originally planned for this hop.