Sunday, February 26, 2012

Quiet Book: Page 1

Although I am going through the book page by page, that is not actually how I completed it. At first I had a ziploc bag for each page where I kept paper templates, felt cut-outs and any notions that corresponded with the page. However, when putting the book together, because I only had two bobbins, I sewed things on a colour at a time. I went through and carefully looked at which colours would have to come before or after different colours, and I managed to only have to do one colour at more than one time. If I'd had more bobbins I probably would have done it a page at a time, but who knows.

The first page of my quiet book contained shapes. I chose nine different shapes, and made them each a different colour. 

Each shape has a removable piece, and a corresponding shape on the page. They snap on and off of the page. The idea of the page is for children to correctly match the removable shape with the shape on the bag, and all practice their dexterity and hand-eye coordination with the snaps. My father said that I shouldn't have made them all different colours, because then the child can rely on the colour rather than the shape, but I wanted it to look fun too.

How I made the page:


I cut out three copies of each shape from the felt, and two copies of each shape from some interfacing. I used regular interfacing, but I wish I had used iron on stuff-I think it would have been better and easier. I layered one of the felt shapes with one of the interfacing shapes, and sewed on the snap using corresponding embroidery floss. 


After that was complete, I took the shape with the part of the snap that stuck up and zig-zagged it on to the page. Then I sandwiched the other shape with the snap attached and the third and unused shape, and straight stitched them together, about 1/8th of an inch in around the outside of the shape. Here is where I had issues with the interfacing sticking out.

Saturday, February 25, 2012

Christmas Presents: Part 3


A long time ago I posted this picture as a preview of my latest project. Now I can finally share the project with you. I took this pile of felt, a bunch of pellon, and a whole lot of extra doo-dads(buttons, velcro, ribbons, zipper, beads, etc.) and made a quiet book. For those of you that don't know, a quiet book is a plush book that includes a number of activities for children to do. They are especially great for church. I decided to make a quiet book because of this post that shows a Star Wars, and a Star Trek quiet book. I didn't want to do something quiet as nerdy, or as elaborate, so I began my search. I spent hours searching the web to see other people's quiet books. One of my favourite places to go for inspiration was Homemade by Jill. I started compiling a list of pages I liked/wanted to include in my book. I mostly based my decisions on my memories (I had a quiet book growing up and seeing certain pages triggered fond memories for me). Over the next little while I am going to post each of the pages, and describe the process I went through to make them. For now here is a picture of the book, and the cutie pie who received it.


Tuesday, February 14, 2012

Christmas Presents: Part 2


I previously posted here about a pair of pyjamas that my friend Becky made. She actually went to the fabric store to get fabric for a table cloth she wanted to try, but didn't find what she wanted. Her inspiration for making pyjamas was the fact that I was there getting fabric for a pair of pyjama pants I was going to make for my husband. He had previously been in the fabric store with me to pick fabric for christmas project #1. While there I realized I had never made anything for him. That's what inspired this project. I was also inspired by his excitement over the most ridiculous fabrics (including his desire to have red vinyl fabric). I used two different fabrics, and made the front of one pant leg and the back of the other pant leg the same. The two fabrics I chose were:


We used a free pattern from Simplicity. It can be found here. Let me tell you there is a reason that it is free. There are things that you are told to do at the beginning that never get referenced again. There were also a number of things that the pattern said that experienced quilters that were helping me told me to ignore. The first thing is the printing of the pattern. It gave instructions that I basically had to do the opposite of. The pattern calls for elastic and a drawstring. I don't know that both are necessary. I did both, and I also made the drawstring just as the pattern called for. That was a mistake! I gave myself blisters turning that thing right side in. Next time, if I use a drawstring, I will definitely be purchasing it somewhere else. If you don't use a drawstring then you won't need the button holes. I was told that 5/8" seam allowance wasn't necessary. I also didn't press my seams open, because I had them finished on the serger. I didn't baste the seam allowances, or leave an opening for the elastic the way they said (I just left a gap when I stitched down the waistline). I'm sure there are more things that I changed too, but I can't remember them anymore. Use at your own risk.


See how excited he was?


I pinned the elastic in, and didn't hem them when I gave them to him, because I wanted to make sure they fit him right. Those things I finished up at Gramma's house. When we got there, I got them out to show her my handiwork and she said "Oh, those are awful!". It's always nice to get encouraging words from your grandmother. Below, they are all finished.


Because Gramma's house is such a great place to get work done, my mom took her cathedral window wall hanging to work on. She managed to get it finished while she was up there, but since then she has decided to put another border around the outside. Here's what it looked like while it was still in the works.


 And of course, gramma always has at least two projects on the go. This is a quilt she is making for my cousin. There is log cabin all around, and the world in the middle. The world is made from postage stamp method, with lots of tiny, tiny squares.


Wow, this post took me a long time. Hopefully it will get me back into the swing of things.

Monday, January 16, 2012

Absence

So, I've been fairly absent from the blogging world recently. Both posting and reading. I guess that's what happens when you start and new job, live in two different cities, and are packing to move all at the same time. I sat down tonight to write a post (I have two more Christmas projects to share), but each project has pictures on my camera that I want to include, and my camera is not currently in the same city as me. So for now I guess I will just say hello, and let you know that I am still around, and still have things to say, but just not at this current moment.

Sunday, January 1, 2012

Christmas Presents: Part 1


Well, here it is. The big reveal. It's time to show off my Christmas crafts. First up, the bags. Awhile ago my friend Sarah showed me a tutorial online for a bag she liked the looks of. I looked it over, found some matching fabric in my stash, and went to work.

The tutorial came from fat quarter Friday at 2 Little Hooligans. It was very straightforward and easy to follow. One of the things it called for was bias tape, and it said you could either use premade, or make your own. This intrigued me, so I did some research online, and gave it a whirl.
I used this site to make the strips and this site to fold them without needing a bias tape maker. These were also easy to follow. I used a 12"x12" square to make enough bias tape for the project. The first time I sewed the fabric in a loop I didn't account for the seam allowance when I matched up the lines, but that was easily fixed.

This was the goal. Courtesy of 2 Little Hooligans.


I first did up a sample to make sure I could put things together and get everything to work. I just used what I could find for the lining, which was a combination of fleece and flannel. The only real problem I had with this project was that I broke a needle sewing two of the side together. On each side there was the background fabric, the lining(2 layers), the pocket fabric(2 layers), the lining of the pocket, and the bias tape(2 layers). It was a little much for my machine to handle. I also made the mistake of not finding the end of the needle before continuing. It was stuck in my machine and caused a few problems. The sample turned out nicely, and I took it to Sarah to get her input. Since I was taking the time to make it, I wanted her opinion, about what would be useful. I did modify the pattern to put a pocket on the inside.

This was my test run.


Once I knew the project was attainable, I went fabric shopping. That meant a trip to Joann's in the states. I bribed my husband with dinner and Captain Crunch to get him to go with me. After that I set to work again. Sarah said she didn't want an inside pocket, but thought she could benefit from another pocket on the outside, so that's what I did. This time I also bought interfacing, hoping not to break another needle. This definitely helped.

Here's the real deal.


Since I had shown her the prototype, that kind of took the surprise out of the gift. Sarah loves Christmas, and she loves gift giving, so I decided I needed to do something more to make it special. Enter the Scrappy Clutch. I found this tutorial over at From an Igloo. I got a few extra supplies at the fabric store so I could also make this. This time I didn't do a test run because there were too many materials that weren't easily substitutable. This project was also my first zipper. I was a little nervous about that, but it went pretty well. Again, this tutorial was well laid out, and easy to follow. The only problem I had with it, was turning it right-side out at the end. This was because I forgot to leave the zipper open, so there was no opening. I had to do a little seam ripping to fix it. The other thing was that the needle on my sewing machine was almost too far in to fit the inside of the bag around and sew the top part to the bottom. Overall I was happy with things, and would probably make this again. The only change I would make is that I might make the bottom part a little skinnier.


Wednesday, December 21, 2011

New Toys

picture courtesy of Koodo


My job and my living arrangements are changing soon, and my husband and I decided it was time for a new phone plan too. We went out yesterday and got ourselves some Blackberry 3G Curves. I know they are not the latest and greatest, but my husband currently has the cheapest phone I could find to replace his broken one, and I have never had a cell phone in my life. Yes, that's right, I'm 24 and this is my first cell phone. I'm not a technophobe or anything, I just never felt the need to have one (more specifically to incur the expense). After the amount of texting and BBMing that I have been doing today, I don't know how I got through yesterday without one.

Wednesday, December 14, 2011

My First Quilt

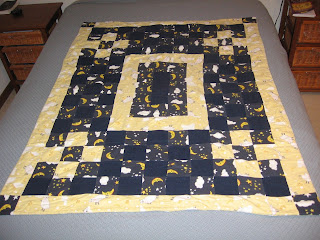
Recently, as I was going through some pictures on my computer, I remembered that I was going to post previous projects on here while I wait for current projects to finish, and Christmas to be over so I can post about them. So, here it goes.


My first quilt. Made with help from Gramma.

One year for Christmas, close to 10 years ago, my gramma gave me, and each of my cousins, a box full of  squares that she had cut out of flannel. This was our chance to do a project with gramma. I had three different fabrics to use and I got to work laying them out on the floor to create a design that I liked. At gramma's house, the way you finalize your quilt design is to lay it out on the basement floor, walk to the top of the stairs, squint if necessary, and see how it looks from afar. Once the design was decided on, we began to sew. When creating quilts, you use a 1/4" seam allowance(meaning you sew in from the edge 1/4"). Being a beginner, I used a 1/4" foot, with a guide that hangs down, so you can butt your fabric up to the edge of the guide and easily make a 1/4". Pairs of squares got sewn together, and then one pair to another pair, and so on, until each row was completely attached, making sure to keep things in order. After that, each row got attached to another row, until the whole quilt was together. Again, you create a sandwich with the quilt top, batting, and a backing. However, this time to finish the quilt, instead of hand quilting it, we tied it. This is exactly what it sounds like. In order to hold the three layers together you take a piece of yarn, stitch it from the top of the quilt, to the back, and around to the front again, and then tie it off in a knot(see picture below). Also, instead of binding, we stitched the back of the quilt directly to the front (with the right sides together), left a gap for turning it right-side out, and then hand stitched the gap closed. Since being made many of the ties have fallen out, but it still keeps me nice and warm.

An example of a tie. Please ignore that my seams don't line up-
it's my first quilt.