Tuesday, December 25, 2012

The Christmas Fruitcake

We have a Christmas tradition in my mom's extended family that I bet many of you don't have. We have a fruitcake that gets passed around from year to year (yes the same fruitcake). It started 11 years ago and has continued strong.

Each year it is given to someone in recognition of an accomplishment over the past year. It stays with them over the next year (sometimes in the freezer...sometimes under a bed...I would not suggest eating fruitcake offered to you by anyone in my family). It comes out again the next Christmas to continue on the tradition. Nobody knows they are receiving the fruitcake until they pick up one of their presents and it weighs significantly more than any of the rest of them. We also always include a note to the recipient of the fruitcake acknowledging their achievements.

Unfortunately we have not been able to get together as a complete family for the last few years. So I write this from over 600 kilometers away, knowing that with the magic of the internet we can connect with our family and continue with tradition.

So here it goes:


Pat,

You are the newest owner of the coveted Fruitcake. Congrats on finishing school. We hear you're moving so you'll have plenty of space to store it over the next 365 days. Hope you're having a wonderful Christmas. All the best in the upcoming new year.

From,
Jeff

So, Merry Christmas everyone (especially my family), enjoy your day, and watch out for 11 year old fruitcake.

Wednesday, August 29, 2012

Grand Rapids, Michigan

Last week my mother, my gramma, and I went to Grand Rapids, Michigan for the AQS Quilt Show. 


We went in celebration of my gramma's 70th birthday. As I've mentioned before, my gramma, my mom and I are all quilters. It was a whirlwind trip. We left for Michigan Thursday morning and headed back on Saturday morning. We spent most of our time at the quilt show, which was lovely, but we didn't get a chance to explore Grand Rapids (which seemed like a lovely city).

Thursday we spent time browsing the merchant mall, and then saw a lecture by Caryl Bryer Fallert. She is an amazing artist, and it was quite incredible to see her process. I definitely don't have that kind of artistic talent, or vision.

Friday was our day to explore the show. We got up bright and early (surprise, surprise), and hit the ground running. We began with the competition quilts (there were a number of other exhibits to look at as well). We walked up and down the aisle looking at the quilts. I took the role of taking pictures, mom informed us of any important information about the quilt found in the booklet, and gramma informed us based on experience. Unfortunately, I do not have permission to post any of the pictures from the show, so I will just have to encourage you to go to your own AQS show (or any other quilt show).

We had been picking out quilts that used two slightly different coloured background such as white and off white, because that was what gramma did on the quilt she made for me and my husband. At one point we came around the corner, and a quilt came into my view. I took in part of the quilt and noticed it had the same two-background style. I started to say to myself "That looks like my quilt", when I was able to take in the whole quilt and noticed that it was my quilt. Unbeknownst to me, my gramma had entered it in the quilt show and it was accepted. I stood there and said "That's my quilt, that's my quilt" while crying (my gramma managed to get a picture of that...I'm sure it's attractive). I was so shocked and so excited. For those that don't know, our quilt was made 2 years ago when we got married. It was hanging at our wedding, but since then has been in competition and we have not had it in our possession. I just wanted to stand there all day and point it out to everyone. I was given permission to post picture (since it is my (my husband would want me to say our) quilt). So here you go.

Yes. We did cross the barrier to get our picture taken.
Again, MY quilt.

Here's a detailed shot of the stipple quilting
and the trapunto.


It was also fun to point out to people that all of the quilting was done by hand. They were amazed (as they should be). I managed to drag myself away from it to look at everything else. But I did have to go back and see it before we left.

Friday night we went to a lecture by Alex Anderson. She was very entertaining and had lots of good stories.

It was a long day. Lots of walking. But also lots of extraordinary quilts. We were so busy we didn't even have a chance to look through everything. Overall, it was a great experience and I'm so glad we got to go. Next time we definitely need more time.

Thanks gramma, it was really special!

Monday, August 27, 2012

Losing My Mind

It has been a busy last few weeks. I've barely spent any time at home, and haven't been to my home congregation in a while, but yesterday I was home and able to go to church. Important to this story is the fact that I live on the other side of the church parking lot and walk to church.

When I arrived at church my mother asked me if I was going to be going swimming. I looked down, saw I was wearing a dress and a cardigan, and wondered why she was asking me this question. So I asked.
"You have a towel," she said.
"No I don't," I replied.
"Yes you do."
Sure enough I looked down and draped over my arm underneath the other things I had carried to church (my computer, my purse, etc.) was my still wet bath towel from that morning.

Later on, I heard her telling other people the story and she said I was going to hang it on the line on my way to church but I forgot. That would make me feel so much better, but the fact of the matter is, I don't have a line to hang it on. I just forgot to stop at the bathroom and hang it up on my way out the door.

It's going to be a long week at work.

Sunday, August 26, 2012

I'm Back

So, you might have noticed that I haven't posted in a while.
A couple weeks ago I was up at my gramma and grampa's house and my gramma got me in trouble for not posting on my blog. She said she checks it every day and there is never anything there. So I'm going to get back into the swing of things.
I have much to write about, but have not been doing a good job of taking pictures of my projects. First I need to get caught up on my photography before I can add posts to my blog.
Just want to let anyone who still checks my blog (which at this point is probably only my gramma) that there is more to come.

Monday, March 12, 2012

Quiet Book: Page 5

That takes us to the barn page. I think this one might be my favourite. It is so super cute. I can say that because this is the only page I used a template on.  I started with this template from homemandebyjill. I modified it slightly to suite my needs/likes, but I really have to give her credit.


The barn I cut out as one big shape. I then cut a T-shape in it to make the doors. I zig-zagged around the outside of the barn. I used brown ribbon to go around the roof, and felt for the window pieces. The ribbon I attached with a straight stitch, and made sure to zig-zag across the loose ends. I made the mistake of putting the white x's(that is a lot easier to say then to try and spell out) after the fact. It was difficult to maneuver and also to make sure I was stitching where I wanted to be. I don't remember what the white on the barn doors was. It came out of my stash. It was wider than I wanted, so I folded it in half and stitched it down before attaching it to the barn. Getting the corners to do what I wanted was a little difficult.


And you haven't even seen the best part yet....


...the occupants of the barn.

There's a chicken,
a pig, 
and a cow.
And they're finger puppets!!!!!!!!!
I grew up with felt finger puppets. I remember having the three little pigs and other fairy tales, so I was so excited when I found this template. I hand stitched on the extras(noses/beaks and spots) but machine stitched the outline with the extras(ears/comb) in between the two layers. I was super happy with how these turned out. They were the first machine stitching I did on the book. The eyes are made with french knots. I did not bother to use the template for the puppets. I traced around my hand for the general shape, and decided that all the other pieces were so small that I didn't bother. This time I made the pocket out of cotton. It definitely helps with getting the puppets in and out, but the back of the pocket is still pellon. I wish I had more to say, because I just want to keep talking about this page...that's how much I love it. Perhaps I will have to do some finger puppets just for fun.

Thursday, March 8, 2012

Quiet Book: Page Four

The next page I'm showcasing is the vegetable page. It doesn't really have a good name(as you can tell). I wanted a page with pockets of some sort. Originally I saw a page with two little beds, and dolls that tucked in and out of bed. That sparked my interest, but I wanted to do something different. I came up with the idea of having pockets, with things coming in and out of them. I decided on various fruits/vegetables. You'll see why with the next page.


This page was a little complicated. I don't know that I'm fully happy with how it turned out, but I will explain it to you anyways. Because the objects are made of felt, and I also made the pockets out of felt, things don't really slide in and out. Next time I would either line the pockets, or make them out of cotton or something else.

Again, I cut out two of each shape, and sewed them together to give a sturdier object. I  hand sewed them together because they were small and odd shapes and I don't trust myself with a sewing machine - not for work like that. Sometime I used embroidery thread and sometimes I used regular thread, it just depended on colours I needed. I got into a good rhythm of stitching. I only did half a stitch(an up or a down) at a time, as I needed to make sure it came out in the right spot on both sides. I would go around the shape twice. The first time I made regular stitches, and the second time I would fill in the gaps. (So where I had gone up, I would go down, and where I had gone down I would go up). I feel like I am not good at explaining it, and I didn't take any pictures, so you'll just have to guess. As I made each object I attached a ribbon to it, that I later attached to the page. I had some trouble with the stitching staying in the ribbon, so as you'll see I made it really ugly to make sure it would stay.  I always made sure to sandwich it in between the two layers, so to disguise the ugliness.


Of course, it couldn't just be a page with pockets. It had to be more than that, so each pocket has an increasing number of items in it.

One apple.


Two ears of corn.


Three carrots.


Four pea pods. (They're my favourite)

Saturday, March 3, 2012

Quiet Book: Page Three

Next up we have the shoe. This page has two purposes: one is to practice tying a shoe, and the other is to practice lacing. The pictures I looked at for inspiration had the shoe facing the other way, with the toe of the show at the bottom of the page. However, I faced my shoe this way, because that's the way a shoe faces when you are tying it on your own foot. The things I thought about when making this book even astound me sometimes.

Sorry about the blurry photo

This one was a little trickier, and took some though as to what order things needed to be attached in. First of all, I wasn't sure about making the holes for the laces. In a lot of the pictures I looked at people had used eyelets, but I didn't have an eyelet tool, and I didn't want this to turn into a really expensive project. I began experimenting with hole punching the felt, but there was no reinforcement around the hole, and it was so close to the edge, that it was easy to rip. I also tried making an eyelet on my sewing machine. Again, it really wasn't as strong as I would like. Enter Walmart. They had a package of 36 eyelets, with the tools you needed for $2. I figured I would try it. It came with the eyelets, a tool for punching a hole to put the eyelet in, and a tool for flattening the back of the eyelet once it's through the hole. It worked surprisingly well for $2. I did have some trouble with the hole punching part on the felt, so I just used the one that came with my sewing machine. The only thing I had to provide was a hammer(have 3 of those) and a hard surface. Note: your dinning room table is not a hard surface(I learned that the hard way). I ended up using my kitchen countertop. You also may want a time when no one is around, because the banging can be a little loud. Note: this is not a craft to do while your child is napping(I did not learn that the hard way). I did have one casualty when putting in the eyelets from pounding a little too long (see top left eyelet in picture below).


The eyelets do leave a bit of a rough edge on the back, where they fold over, so I did two layers of felt, each with eyelets that lined up, and then sewed them together so that the rough edges of each were facing in. The difficulty I had in this was that the eyelets make the felt thicker, and because they were so close to the edge, I had trouble sewing around them. I would probably move them around more next time.


Here's a picture of the inside of the shoe. I did not sew the tongue down all the way around, so that it would more resemble a shoe. Also, my tongue is a little crooked. The shoelace I got from my father's stash. I chose one that was the right length to lace up and still have plenty to tie. It ended up being longer then I initially thought it would need to be in order to do that. It didn't have a partner so I didn't feel bad stealing it. My mom suggested that I tack the shoelace down in the middle at the bottom of where it laces up, so that you could still lace the shoe, but so that the shoelace couldn't come out and get lost. I forgot. Also, I apparently can't measure as well as I thought I could because originally I designed the shoe to go straight up and down, but it wouldn't fit on the page, which is why it's on an angle.

Friday, March 2, 2012

Quiet Book: Page 2

So, as I am starting to write this I realized that I don't remember the page order of my book. I reorganized all of the pictures and put them in folders, so your guess is as good as mine. I guess I will just make it up.

This page is an analog clock. I know this is something I struggled with as a child. It still gets me sometimes if I don't take enough time to think about it.


This was a fairly easy page to make as there weren't many steps involved.  I first decided how big I wanted the outer circle to be, and then decided how big I wanted the numbers to be, which then made my decision for how big the inner circle would be. I then got out my compass, made templates of the two circles and then cut them out. As with everything, I made a paper template, and then pinned it to the felt and cut it out. The colours I chose for the clock were mostly determined by which colours I had enough of.

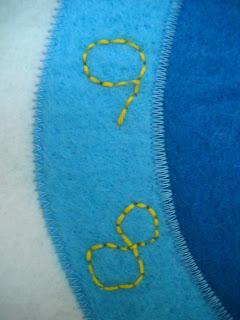
I hand stitched each of the numbers on, and did not use any sort of template. I just eyeballed it for what the numbers looked like and how they were spaced. I ended up redoing the number three at least once, and there is some spacing that I'm not quite happy with, and some numbers that are a little crooked for my liking. I'm wasn't sure what I could do differently, but then I saw on futuregirl that she traces onto stabilizer, stitches and then carefully removes the stabilizer. Perhaps another time.


The hands took a couple attempts as well. At first I cut them out of felt and then attached them with a brad. I even remembered to attach them with the brad before I sewed the clock to the page! However, felt on felt is not a good idea. It does not rotate, which is kind of an important feature of the hands of the clock. I then tried putting washers between the layers in order to separate the felt, but it really didn't help much. Finally I dug through my recycling bin and pulled out the lid of a margarine dish (don't worry I washed it). I was worried that the edges might be too sharp, but I rounded all of the corners and it was fine. Plus they moved! All that was left was to zig-zag the clock to the page. Overall I was very happy with the page.

Sunday, February 26, 2012

Quiet Book: Page 1

Although I am going through the book page by page, that is not actually how I completed it. At first I had a ziploc bag for each page where I kept paper templates, felt cut-outs and any notions that corresponded with the page. However, when putting the book together, because I only had two bobbins, I sewed things on a colour at a time. I went through and carefully looked at which colours would have to come before or after different colours, and I managed to only have to do one colour at more than one time. If I'd had more bobbins I probably would have done it a page at a time, but who knows.

The first page of my quiet book contained shapes. I chose nine different shapes, and made them each a different colour. 

Each shape has a removable piece, and a corresponding shape on the page. They snap on and off of the page. The idea of the page is for children to correctly match the removable shape with the shape on the bag, and all practice their dexterity and hand-eye coordination with the snaps. My father said that I shouldn't have made them all different colours, because then the child can rely on the colour rather than the shape, but I wanted it to look fun too.

How I made the page:


I cut out three copies of each shape from the felt, and two copies of each shape from some interfacing. I used regular interfacing, but I wish I had used iron on stuff-I think it would have been better and easier. I layered one of the felt shapes with one of the interfacing shapes, and sewed on the snap using corresponding embroidery floss. 


After that was complete, I took the shape with the part of the snap that stuck up and zig-zagged it on to the page. Then I sandwiched the other shape with the snap attached and the third and unused shape, and straight stitched them together, about 1/8th of an inch in around the outside of the shape. Here is where I had issues with the interfacing sticking out.

Saturday, February 25, 2012

Christmas Presents: Part 3


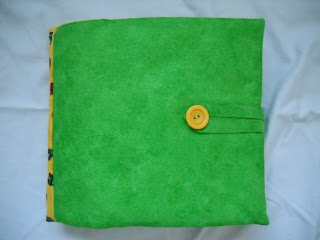
A long time ago I posted this picture as a preview of my latest project. Now I can finally share the project with you. I took this pile of felt, a bunch of pellon, and a whole lot of extra doo-dads(buttons, velcro, ribbons, zipper, beads, etc.) and made a quiet book. For those of you that don't know, a quiet book is a plush book that includes a number of activities for children to do. They are especially great for church. I decided to make a quiet book because of this post that shows a Star Wars, and a Star Trek quiet book. I didn't want to do something quiet as nerdy, or as elaborate, so I began my search. I spent hours searching the web to see other people's quiet books. One of my favourite places to go for inspiration was Homemade by Jill. I started compiling a list of pages I liked/wanted to include in my book. I mostly based my decisions on my memories (I had a quiet book growing up and seeing certain pages triggered fond memories for me). Over the next little while I am going to post each of the pages, and describe the process I went through to make them. For now here is a picture of the book, and the cutie pie who received it.


Tuesday, February 14, 2012

Christmas Presents: Part 2


I previously posted here about a pair of pyjamas that my friend Becky made. She actually went to the fabric store to get fabric for a table cloth she wanted to try, but didn't find what she wanted. Her inspiration for making pyjamas was the fact that I was there getting fabric for a pair of pyjama pants I was going to make for my husband. He had previously been in the fabric store with me to pick fabric for christmas project #1. While there I realized I had never made anything for him. That's what inspired this project. I was also inspired by his excitement over the most ridiculous fabrics (including his desire to have red vinyl fabric). I used two different fabrics, and made the front of one pant leg and the back of the other pant leg the same. The two fabrics I chose were:


We used a free pattern from Simplicity. It can be found here. Let me tell you there is a reason that it is free. There are things that you are told to do at the beginning that never get referenced again. There were also a number of things that the pattern said that experienced quilters that were helping me told me to ignore. The first thing is the printing of the pattern. It gave instructions that I basically had to do the opposite of. The pattern calls for elastic and a drawstring. I don't know that both are necessary. I did both, and I also made the drawstring just as the pattern called for. That was a mistake! I gave myself blisters turning that thing right side in. Next time, if I use a drawstring, I will definitely be purchasing it somewhere else. If you don't use a drawstring then you won't need the button holes. I was told that 5/8" seam allowance wasn't necessary. I also didn't press my seams open, because I had them finished on the serger. I didn't baste the seam allowances, or leave an opening for the elastic the way they said (I just left a gap when I stitched down the waistline). I'm sure there are more things that I changed too, but I can't remember them anymore. Use at your own risk.


See how excited he was?


I pinned the elastic in, and didn't hem them when I gave them to him, because I wanted to make sure they fit him right. Those things I finished up at Gramma's house. When we got there, I got them out to show her my handiwork and she said "Oh, those are awful!". It's always nice to get encouraging words from your grandmother. Below, they are all finished.


Because Gramma's house is such a great place to get work done, my mom took her cathedral window wall hanging to work on. She managed to get it finished while she was up there, but since then she has decided to put another border around the outside. Here's what it looked like while it was still in the works.


 And of course, gramma always has at least two projects on the go. This is a quilt she is making for my cousin. There is log cabin all around, and the world in the middle. The world is made from postage stamp method, with lots of tiny, tiny squares.


Wow, this post took me a long time. Hopefully it will get me back into the swing of things.

Monday, January 16, 2012

Absence

So, I've been fairly absent from the blogging world recently. Both posting and reading. I guess that's what happens when you start and new job, live in two different cities, and are packing to move all at the same time. I sat down tonight to write a post (I have two more Christmas projects to share), but each project has pictures on my camera that I want to include, and my camera is not currently in the same city as me. So for now I guess I will just say hello, and let you know that I am still around, and still have things to say, but just not at this current moment.

Sunday, January 1, 2012

Christmas Presents: Part 1


Well, here it is. The big reveal. It's time to show off my Christmas crafts. First up, the bags. Awhile ago my friend Sarah showed me a tutorial online for a bag she liked the looks of. I looked it over, found some matching fabric in my stash, and went to work.

The tutorial came from fat quarter Friday at 2 Little Hooligans. It was very straightforward and easy to follow. One of the things it called for was bias tape, and it said you could either use premade, or make your own. This intrigued me, so I did some research online, and gave it a whirl.
I used this site to make the strips and this site to fold them without needing a bias tape maker. These were also easy to follow. I used a 12"x12" square to make enough bias tape for the project. The first time I sewed the fabric in a loop I didn't account for the seam allowance when I matched up the lines, but that was easily fixed.

This was the goal. Courtesy of 2 Little Hooligans.


I first did up a sample to make sure I could put things together and get everything to work. I just used what I could find for the lining, which was a combination of fleece and flannel. The only real problem I had with this project was that I broke a needle sewing two of the side together. On each side there was the background fabric, the lining(2 layers), the pocket fabric(2 layers), the lining of the pocket, and the bias tape(2 layers). It was a little much for my machine to handle. I also made the mistake of not finding the end of the needle before continuing. It was stuck in my machine and caused a few problems. The sample turned out nicely, and I took it to Sarah to get her input. Since I was taking the time to make it, I wanted her opinion, about what would be useful. I did modify the pattern to put a pocket on the inside.

This was my test run.


Once I knew the project was attainable, I went fabric shopping. That meant a trip to Joann's in the states. I bribed my husband with dinner and Captain Crunch to get him to go with me. After that I set to work again. Sarah said she didn't want an inside pocket, but thought she could benefit from another pocket on the outside, so that's what I did. This time I also bought interfacing, hoping not to break another needle. This definitely helped.

Here's the real deal.


Since I had shown her the prototype, that kind of took the surprise out of the gift. Sarah loves Christmas, and she loves gift giving, so I decided I needed to do something more to make it special. Enter the Scrappy Clutch. I found this tutorial over at From an Igloo. I got a few extra supplies at the fabric store so I could also make this. This time I didn't do a test run because there were too many materials that weren't easily substitutable. This project was also my first zipper. I was a little nervous about that, but it went pretty well. Again, this tutorial was well laid out, and easy to follow. The only problem I had with it, was turning it right-side out at the end. This was because I forgot to leave the zipper open, so there was no opening. I had to do a little seam ripping to fix it. The other thing was that the needle on my sewing machine was almost too far in to fit the inside of the bag around and sew the top part to the bottom. Overall I was happy with things, and would probably make this again. The only change I would make is that I might make the bottom part a little skinnier.