Wednesday, December 21, 2011

New Toys

picture courtesy of Koodo


My job and my living arrangements are changing soon, and my husband and I decided it was time for a new phone plan too. We went out yesterday and got ourselves some Blackberry 3G Curves. I know they are not the latest and greatest, but my husband currently has the cheapest phone I could find to replace his broken one, and I have never had a cell phone in my life. Yes, that's right, I'm 24 and this is my first cell phone. I'm not a technophobe or anything, I just never felt the need to have one (more specifically to incur the expense). After the amount of texting and BBMing that I have been doing today, I don't know how I got through yesterday without one.

Wednesday, December 14, 2011

My First Quilt

Recently, as I was going through some pictures on my computer, I remembered that I was going to post previous projects on here while I wait for current projects to finish, and Christmas to be over so I can post about them. So, here it goes.


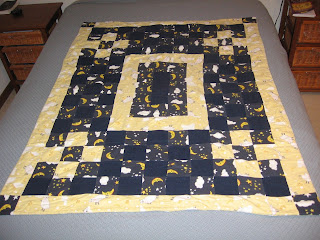
My first quilt. Made with help from Gramma.

One year for Christmas, close to 10 years ago, my gramma gave me, and each of my cousins, a box full of  squares that she had cut out of flannel. This was our chance to do a project with gramma. I had three different fabrics to use and I got to work laying them out on the floor to create a design that I liked. At gramma's house, the way you finalize your quilt design is to lay it out on the basement floor, walk to the top of the stairs, squint if necessary, and see how it looks from afar. Once the design was decided on, we began to sew. When creating quilts, you use a 1/4" seam allowance(meaning you sew in from the edge 1/4"). Being a beginner, I used a 1/4" foot, with a guide that hangs down, so you can butt your fabric up to the edge of the guide and easily make a 1/4". Pairs of squares got sewn together, and then one pair to another pair, and so on, until each row was completely attached, making sure to keep things in order. After that, each row got attached to another row, until the whole quilt was together. Again, you create a sandwich with the quilt top, batting, and a backing. However, this time to finish the quilt, instead of hand quilting it, we tied it. This is exactly what it sounds like. In order to hold the three layers together you take a piece of yarn, stitch it from the top of the quilt, to the back, and around to the front again, and then tie it off in a knot(see picture below). Also, instead of binding, we stitched the back of the quilt directly to the front (with the right sides together), left a gap for turning it right-side out, and then hand stitched the gap closed. Since being made many of the ties have fallen out, but it still keeps me nice and warm.

An example of a tie. Please ignore that my seams don't line up-
it's my first quilt.

Sunday, December 11, 2011

Palm Trees and Pyjamas

Last weekend my friend Becky came to visit. It turned into a very crafty weekend. My father hosted a luau, and wanted a palm tree for decorations. He found a few ideas online of trees made out of carpet rolls and an umbrella covered in leaves. Friday night Becky arrived and we went to work. I already had an umbrella that was slightly broken. I'd never replaced it because it wasn't very broken, just one of the spokes, but every time I used it it would get caught in my hair, which was really annoying. I was happy for an excuse to replace it. We headed to the dollar store to find something to make the leaves out of.  The only paper big enough that we could think of was bristol board, but we felt like that would be too stiff for our purposes. Turns out the dollar store only had blue and red bristol board anyways, but we found a green plastic table cloth we thought would do the trick.

When we got home Becky made a template out of newspaper. She decided to make eight leaves, one for each section of the umbrella. She also decided to make the top of the leaf long and flat, to overlap across the top of the umbrella. It worked out perfectly that the length she made the leaf was the exact width of half the tablecloth. We decided the plastic was a little thin, so we doubled it over for each leaf. It also worked out perfectly that the width of the leaf was 1/8th of the length of the tablecloth, so we folded the tablecloth into 8 sections, and she was able to cut all of the leaves out at once. This was a real time saver. She also cut notches up the sides of the leaves to give them that palm tree look. Once they were all cut out she attached them temporarily with tape, and then stitched across the top of them with thread to permanently hold them on. We also drew veins down the leaves and out to the sides with a green sharpie. We didn't decide on this until after the leaves were attached. Next time, we would do that before hand.

Here Becky is stitching on the leaves.

I think it's still a viable option as an umbrella.
(The tablecloth is plastic)
It even folded back up to be shipped off to the party! My dad cut out the black parts of the umbrella down at the bottom where the leaves didn't cover everything, and stuck it in the carpet roll. I will post a picture of the finished product later. It is currently set up in my parents living room and is a cheery addition, particularly for winter. Over all it took about an hour and a half to make.
[Disclaimer: The term "we" is used strictly in the most general sense. Becky did all of the work. I was making name tags and stuffing envelopes, and consulting on palm tree decisions.]


The second thing we did was take a trip to the states to go to Joann's. It is only about half an hour for us to get to Joann's (depending on the border) and I have a hard time doing any sewing projects without going there because fabric in Canada is so expensive. Becky had seen some ideas online about making a tablecloth that she had wanted to try. We saw in the flyer that muslin was $1.99/yard, so off we went. Apparently muslin wasn't actually on sale, so she didn't end up getting any. As a consolation prize flannel was 60% off and I had a coupon for 20% off your entire purchase, plus Becky's work is having a Christmas breakfast where you are supposed to wear pyjamas, so she decided she would make some. As a side note, the fabric she bought would have regularly been $21 and she got it for $7. That's not too shabby I think. Everything we ended up buying was on sale, so we managed to hit up Hobby Lobby, Target and Joann's for $35. The guy at the border laughed at us and asked if we bought more than one thing. Also, a second side note: All of the flannel said it was not intended for use in children's sleepwear. We didn't really know what that meant, but we figured since we are not children we were fine. And now back to our regularly scheduled programming. Since Becky doesn't have a sewing machine buying the flannel meant we had to get the pyjamas made before she went back home. We got started right away cutting out the pattern. We also took it up to be serged(is that a verb?) by a friend of mine. There were only three seams. Neither Becky nor I had seen an serger in action before. Becky didn't even know what they did. (They finish the edge of the seam so it looks like anything you would buy from the store, and they cut off excess fabric at the same time). After that all that was left was to fold over the top, feed the elastic through, and hem the bottoms. They also have a drawstring, but she was going to get something from Michaels and feed that through at home. She is going to be styling at her breakfast.


All in all, it was a very successful and crafty weekend.

Thursday, December 1, 2011

Fish Quilt: The Process Part 2

Step 3: Quilting


Substep A: Marking the Quilt
The next part in the process is to decide how you are going to quilt the quilt. There are multiple ways to do this including doing it by machine or by hand. There are different styles for quilting by machine or by hand. I have never quilted by machine, so I can't speak to that. We chose to stitch in the ditch around the fish, which means to quilt along the seams. It is good to decide that you are going to do this while you are still making the quilt top, so that you can press the seams accordingly. Somehow we still had a few going the wrong way. I also marked the quilt. We did scales on the fish, which I made a template for, and swirls in the blue background, which I drew free-hand. I did most of the marking in pencil, but on some of the fish that were darker I marked them with chalk.


Substep B: Quilting
The next step is to actually quilt it. Each quilt consists of three layers: the back, the batting and the quilt top. You sandwich them together, and then the quilting is to keep them together. We put the quilt in the frames, which temporarily holds everything together and stretches it out while you quilt it.

You start quilting at the outer edge, and when you can no longer reach any farther, you roll the sides under, so you can get closer and closer to the middle(sorry I forgot to take a picture). We always roll the long side. I believe it's so that it doesn't get too thick, but I made that up.

The Cast of Characters
In order to quilt you need quilting thread, sharp scissors, a needle and a thimble (and a quilt). One of the challenges with this quilt was that the swirls went in every direction. It is definitely easiest to quilt from right to left. After working in a knot, you work your needle up and down, so that you have a number of stitches on your needle and then pull it all the way through.

Here is my needle with a few stitches on it
waiting to be pulled through.
This is an example of stitching in the ditch
Step 4: Finishing Touches

This is where everything comes together. Once you finish quilting everything, the quilt comes out of the frames. Next you attach a binding to the quilt. This is a piece of fabric that wraps around from the front of the quilt to the back and covers up the raw edge around the quilt. The binding gets attached on one side by machine, and on the other side by hand.

This is the corner with the binding attached
I also made a tag for the back of the quilt. Usually I would hand write it, but I couldn't find my fabric pen, so I decided to try out the full extent of my mom's new machine, and stitched the letters. I forgot to put some interfacing behind the fabric, which meant it puckered a bit, but overall I was happy with it.


And that's it. You're done. Wasn't that simple? We started at the beginning of September, and finished by mid-November for the baby shower. At first we worked only on Sundays, but once we started quilting, the race was on, and we worked almost every day on it. I'm going to leave you with a few more pictures of the quilting, and the finished product.

This was my favourite fish. This picture also gives you
an idea of the scale quilting and the swirls.

Here's the finished product. The sunlight really brings out the quilting.