Wednesday, December 21, 2011

New Toys

picture courtesy of Koodo


My job and my living arrangements are changing soon, and my husband and I decided it was time for a new phone plan too. We went out yesterday and got ourselves some Blackberry 3G Curves. I know they are not the latest and greatest, but my husband currently has the cheapest phone I could find to replace his broken one, and I have never had a cell phone in my life. Yes, that's right, I'm 24 and this is my first cell phone. I'm not a technophobe or anything, I just never felt the need to have one (more specifically to incur the expense). After the amount of texting and BBMing that I have been doing today, I don't know how I got through yesterday without one.

Wednesday, December 14, 2011

My First Quilt

Recently, as I was going through some pictures on my computer, I remembered that I was going to post previous projects on here while I wait for current projects to finish, and Christmas to be over so I can post about them. So, here it goes.


My first quilt. Made with help from Gramma.

One year for Christmas, close to 10 years ago, my gramma gave me, and each of my cousins, a box full of  squares that she had cut out of flannel. This was our chance to do a project with gramma. I had three different fabrics to use and I got to work laying them out on the floor to create a design that I liked. At gramma's house, the way you finalize your quilt design is to lay it out on the basement floor, walk to the top of the stairs, squint if necessary, and see how it looks from afar. Once the design was decided on, we began to sew. When creating quilts, you use a 1/4" seam allowance(meaning you sew in from the edge 1/4"). Being a beginner, I used a 1/4" foot, with a guide that hangs down, so you can butt your fabric up to the edge of the guide and easily make a 1/4". Pairs of squares got sewn together, and then one pair to another pair, and so on, until each row was completely attached, making sure to keep things in order. After that, each row got attached to another row, until the whole quilt was together. Again, you create a sandwich with the quilt top, batting, and a backing. However, this time to finish the quilt, instead of hand quilting it, we tied it. This is exactly what it sounds like. In order to hold the three layers together you take a piece of yarn, stitch it from the top of the quilt, to the back, and around to the front again, and then tie it off in a knot(see picture below). Also, instead of binding, we stitched the back of the quilt directly to the front (with the right sides together), left a gap for turning it right-side out, and then hand stitched the gap closed. Since being made many of the ties have fallen out, but it still keeps me nice and warm.

An example of a tie. Please ignore that my seams don't line up-
it's my first quilt.

Sunday, December 11, 2011

Palm Trees and Pyjamas

Last weekend my friend Becky came to visit. It turned into a very crafty weekend. My father hosted a luau, and wanted a palm tree for decorations. He found a few ideas online of trees made out of carpet rolls and an umbrella covered in leaves. Friday night Becky arrived and we went to work. I already had an umbrella that was slightly broken. I'd never replaced it because it wasn't very broken, just one of the spokes, but every time I used it it would get caught in my hair, which was really annoying. I was happy for an excuse to replace it. We headed to the dollar store to find something to make the leaves out of.  The only paper big enough that we could think of was bristol board, but we felt like that would be too stiff for our purposes. Turns out the dollar store only had blue and red bristol board anyways, but we found a green plastic table cloth we thought would do the trick.

When we got home Becky made a template out of newspaper. She decided to make eight leaves, one for each section of the umbrella. She also decided to make the top of the leaf long and flat, to overlap across the top of the umbrella. It worked out perfectly that the length she made the leaf was the exact width of half the tablecloth. We decided the plastic was a little thin, so we doubled it over for each leaf. It also worked out perfectly that the width of the leaf was 1/8th of the length of the tablecloth, so we folded the tablecloth into 8 sections, and she was able to cut all of the leaves out at once. This was a real time saver. She also cut notches up the sides of the leaves to give them that palm tree look. Once they were all cut out she attached them temporarily with tape, and then stitched across the top of them with thread to permanently hold them on. We also drew veins down the leaves and out to the sides with a green sharpie. We didn't decide on this until after the leaves were attached. Next time, we would do that before hand.

Here Becky is stitching on the leaves.

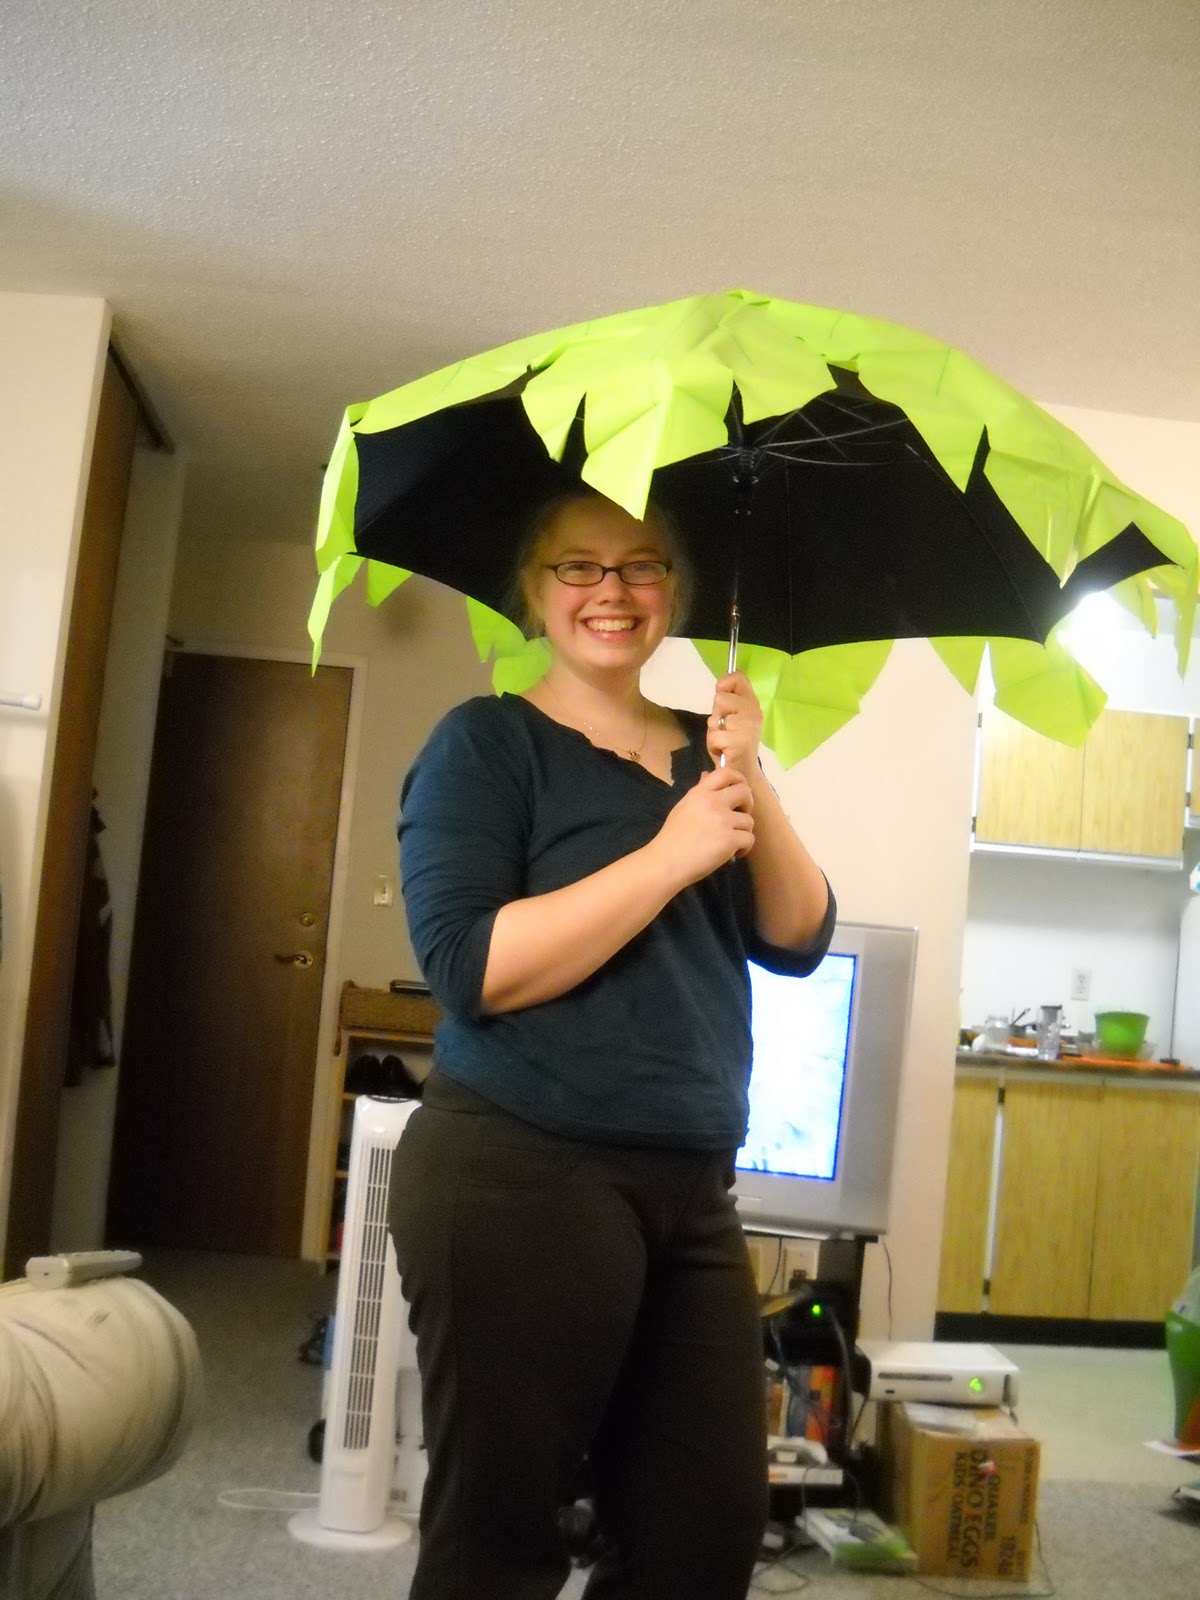
I think it's still a viable option as an umbrella.
(The tablecloth is plastic)
It even folded back up to be shipped off to the party! My dad cut out the black parts of the umbrella down at the bottom where the leaves didn't cover everything, and stuck it in the carpet roll. I will post a picture of the finished product later. It is currently set up in my parents living room and is a cheery addition, particularly for winter. Over all it took about an hour and a half to make.
[Disclaimer: The term "we" is used strictly in the most general sense. Becky did all of the work. I was making name tags and stuffing envelopes, and consulting on palm tree decisions.]


The second thing we did was take a trip to the states to go to Joann's. It is only about half an hour for us to get to Joann's (depending on the border) and I have a hard time doing any sewing projects without going there because fabric in Canada is so expensive. Becky had seen some ideas online about making a tablecloth that she had wanted to try. We saw in the flyer that muslin was $1.99/yard, so off we went. Apparently muslin wasn't actually on sale, so she didn't end up getting any. As a consolation prize flannel was 60% off and I had a coupon for 20% off your entire purchase, plus Becky's work is having a Christmas breakfast where you are supposed to wear pyjamas, so she decided she would make some. As a side note, the fabric she bought would have regularly been $21 and she got it for $7. That's not too shabby I think. Everything we ended up buying was on sale, so we managed to hit up Hobby Lobby, Target and Joann's for $35. The guy at the border laughed at us and asked if we bought more than one thing. Also, a second side note: All of the flannel said it was not intended for use in children's sleepwear. We didn't really know what that meant, but we figured since we are not children we were fine. And now back to our regularly scheduled programming. Since Becky doesn't have a sewing machine buying the flannel meant we had to get the pyjamas made before she went back home. We got started right away cutting out the pattern. We also took it up to be serged(is that a verb?) by a friend of mine. There were only three seams. Neither Becky nor I had seen an serger in action before. Becky didn't even know what they did. (They finish the edge of the seam so it looks like anything you would buy from the store, and they cut off excess fabric at the same time). After that all that was left was to fold over the top, feed the elastic through, and hem the bottoms. They also have a drawstring, but she was going to get something from Michaels and feed that through at home. She is going to be styling at her breakfast.


All in all, it was a very successful and crafty weekend.

Thursday, December 1, 2011

Fish Quilt: The Process Part 2

Step 3: Quilting


Substep A: Marking the Quilt
The next part in the process is to decide how you are going to quilt the quilt. There are multiple ways to do this including doing it by machine or by hand. There are different styles for quilting by machine or by hand. I have never quilted by machine, so I can't speak to that. We chose to stitch in the ditch around the fish, which means to quilt along the seams. It is good to decide that you are going to do this while you are still making the quilt top, so that you can press the seams accordingly. Somehow we still had a few going the wrong way. I also marked the quilt. We did scales on the fish, which I made a template for, and swirls in the blue background, which I drew free-hand. I did most of the marking in pencil, but on some of the fish that were darker I marked them with chalk.


Substep B: Quilting
The next step is to actually quilt it. Each quilt consists of three layers: the back, the batting and the quilt top. You sandwich them together, and then the quilting is to keep them together. We put the quilt in the frames, which temporarily holds everything together and stretches it out while you quilt it.

You start quilting at the outer edge, and when you can no longer reach any farther, you roll the sides under, so you can get closer and closer to the middle(sorry I forgot to take a picture). We always roll the long side. I believe it's so that it doesn't get too thick, but I made that up.

The Cast of Characters
In order to quilt you need quilting thread, sharp scissors, a needle and a thimble (and a quilt). One of the challenges with this quilt was that the swirls went in every direction. It is definitely easiest to quilt from right to left. After working in a knot, you work your needle up and down, so that you have a number of stitches on your needle and then pull it all the way through.

Here is my needle with a few stitches on it
waiting to be pulled through.
This is an example of stitching in the ditch
Step 4: Finishing Touches

This is where everything comes together. Once you finish quilting everything, the quilt comes out of the frames. Next you attach a binding to the quilt. This is a piece of fabric that wraps around from the front of the quilt to the back and covers up the raw edge around the quilt. The binding gets attached on one side by machine, and on the other side by hand.

This is the corner with the binding attached
I also made a tag for the back of the quilt. Usually I would hand write it, but I couldn't find my fabric pen, so I decided to try out the full extent of my mom's new machine, and stitched the letters. I forgot to put some interfacing behind the fabric, which meant it puckered a bit, but overall I was happy with it.


And that's it. You're done. Wasn't that simple? We started at the beginning of September, and finished by mid-November for the baby shower. At first we worked only on Sundays, but once we started quilting, the race was on, and we worked almost every day on it. I'm going to leave you with a few more pictures of the quilting, and the finished product.

This was my favourite fish. This picture also gives you
an idea of the scale quilting and the swirls.

Here's the finished product. The sunlight really brings out the quilting.

Wednesday, November 30, 2011

Dreams Come True

This past Friday I went with my husband and a few of my friends to see this guy perform in concert.


For those of you that don't know(I'm guessing that's most of you), this is Paul Brandt. He's my all time favourite country singer and he's Canadian(shout out to Calgary). Another Canadian band, High Valley, made up of three brothers with Mexican Mennonite heritage, opened for him (we were treated to the Backstreet Boys in Low German). Anyways, back to Paul Brandt. I had wanted to go to his concert while I was doing my undergrad 4 years ago, but unfortunately it conflicted with one of my exams. He hasn't toured since, but recently kicked off a new tour. So off we went to Brantford and watched it. I had a fantastic time and would go again in a heart beat.
See how much fun we're having?
Please ignore the fact that I seem to have one and a half eyes.
Although this has nothing to do with crafts or math, it falls under the category of other things I love.

Wednesday, November 23, 2011

Nerd Alert

I spent the weekend in Waterloo planning questions for a math contest. Isn't it nice to get together with people who have similar interests to you? I had a wonderful time discussing math, education and even board games. I also got to whip out some first year math to help someone. It's also so encouraging to see so many teachers who care about getting students interested in math. It might have been a little nerdy for some people, but it was perfect for me.

Wednesday, November 16, 2011

Fish Quilt:The Process Part 1

You're probably going to get sick of hearing about the fish quilt, but it consumed my life for a while, so it will consume my blog accordingly. I want to outline the quilt making process for those of you that are unfamiliar with it.


Step 1: Planning


Substep A: Decide to make a quilt/Choose a pattern
When we heard that friends of ours were having a baby, my mother suggested to me that we make a baby quilt. I agreed and we started thinking. Now, making a baby quilt for a known baby means you have 9 months, and since most couples don't announce until the 3 month mark, in reality 9 months is down to 6 months. Add to that some gathering of ideas, some hemming and hawing, and some reconnaissance work to find out colour schemes, and all of a sudden it was the end of August, and the baby is coming at the beginning of December. We were headed to my grandparents for the weekend and gave ourselves an ultimatum of the end of the weekend to choose a pattern. Once we got to gramma's we got right to work flipping through quilt books, quilt magazines, quilt patterns, and the internet. Finally we found a picture of a quilt we liked called "Swimmies" by Lisa Boyer. It was settled. This would be the quilt we would make.


Substep B: Choose Fabrics
There are two advantages to having a gramma, and a mom who quilt. The first is knowledge. You can always ask them questions when you get stuck or don't know. The second is a supplies. Chances are if you don't have something, they will. This is how we got started on our quilt. Gramma started pulling out bins and boxes and containers and drawers full of fabric, and we started picking out the fabrics we liked. It seemed like a never ending supply of fabric. Once we had picked out our pile of fabric we began sorting them, trying to decide which ones looked good together. This is where my mom and I differ from my gramma. She is very good a colour choices. We chose to get a little support in this area by looking at the picture we had found online. All of the fabric for the fish and the outer border, as well as the backing came from my gramma's stash(Thanks Gramma!). We went to the fabric store for the background and the inner border. (Quilt Making Tip #1: Find a gramma, or a friend with a good fabric stash, and good advice.) When you buy fabric it's a good idea to figure out how much you will need and buy a little extra. I didn't do so well in this department. It was pretty close for a while, and since we had gone to the states to buy the fabric, we didn't want to have to go back.


This is all of the scrap we had left from the background.
For reference that largest piece is 26" long at the longest
 point and 6" wide.


Step 2: Piecing
Substep A: Practice
Because we were making the quilt from a picture and not a pattern, we did a practice run. I drew up an exact copy of what the block would look like, based on the proportions from the picture(yes I did blow up the picture and hold my ruler up to the computer screen), Gramma got out her scrap fabric, and we got to work. Although it was a little tricky, we came out with a practice block after not too much time or too much trouble. (Quilt Making Tip #2: Do your own practice block.)


Substep B: Create the quilt top
This is it. All that planning and practice is for this moment. You take those nice pieces of fabric, chop them up and sew them back together. For us this was also the most frustrating part of the process. The practice block had gone so nicely at gramma's, but at home, we couldn't get it to work(see QMT #2). We spend a frustrating Sunday afternoon and couldn't even finish one block. When we finally did finish we decided the best way to go about things was to do each section of the fish for all of the blocks(all the tails, all the fins, etc.) rather than each fish one at a time, because otherwise we would forget how we did it each time. We used a process called paper-piecing, which is pretty much what it sounds like. Along with stitching the fabric you use a piece of paper to help make the correct angles, etc. Once it is stitched you rip the paper off. It also uses more material than you might think(see photo above). Once each fish was made, we sewed them together in rows, with spacing pieces in between, and then each of the rows together. We also pieced the border with 3.5"x1.5" strips from Gramma's stash. The inner and outer border got sewed around the outside, and we were done.


This was the quilt top completely put together.
(Sorry about the Blackberry quality photo)
That's the end of part 1 of the process. I started writing this a long time ago and am just now finishing (partly due to procrastination, but we'll blame it mostly on my computer cord breaking). Hopefully I won't take so long in putting up the second part.

Saturday, November 12, 2011

Finished Fish Quilt

Well, as promised, here are some pictures of the quilt I was making with my mother. I'm going to take a few more tomorrow to try and get better lighting, so you can see the quilting better, but here's a general idea.

Here is a picture of the whole quilt.

This is an up close picture of the swirls we quilted.

Here is a fish with bubbles, and swirls around it.
I know the last picture isn't great, but I was hoping it would give you a better idea of the quilting we did. I will try and post better pictures later, and also some pictures and information about the process.

Thursday, November 10, 2011

Intimidated

I have a confession to make. When I thought I was writing to the big wide world of the internet, I was excited to share my thoughts, ideas, and projects. I thought it would be an adventure. But now that I know that my mom, and my gramma read my blog...I'm a little intimidated. Apparently I have no problem sharing with complete strangers(let's be honest...I didn't actually picture anyone reading my blog), but with my family?...not so much.

One of my favourite crafty activities to do is to quilt. It is something I have mostly learned through observation. Both my mom and my gramma are quilters. My gramma produces quilts like nobody's business. She's always got at least two projects on the go. I've also seen my mom produce a number of quilts, although not nearly as many as my gramma. Between raising two kids, and working part-time or full-time, she squeezes quilting in when she has time, or for special occasions. Another way that I have been exposed to quilting, is through my church. There are a number of ladies that meet every Tuesday to quilt. When I was a child, my mother would take us and she would quilt while we would play. Even when I was in school, we would go and have lunch with everyone. Since I have become a "grown-up" I have gone to quilt whenever I have the chance. I have learned so much from the "quilting ladies" and have enjoyed their friendship and mentorship. All of that do say, I have never been explicitly taught most of what I know. I have learned by watching, and by getting oral instructions. Because of this I don't always feel comfortable about my abilities. I feel intimidated by the experience and the knowledge of those around me, and am very aware of my limited knowledge.

Now that we've had that nice moment, I just wanted to say that although I am working on a number of projects, they are all intended for gifts, and thus I do not want to reveal them online. I have been photographing some of the things I have already done, and will be posting those until after Christmas, when I can show you my current projects. I leave you with a picture of the beginning of my current project(I don't think it reveals to much) and the current state of my crafting dining room table.


Tuesday, November 8, 2011

It's Out!

Well, my mom and I have been quilting up a storm (with a little help-thanks Lynn!). She's been working on it since she got back from Hawaii, and I spent all my waking time that I could at my parents. We worked Saturday evening, all afternoon on Sunday, Monday evening and tonight and it is finally out of the frames. We are getting closer and closer to our goal of getting it done for Saturday. The rest is pretty much up to my mom as I won't be around again until Saturday, but I could put a few stitches in in the car on the way to the shower if I need. Oh, and I'm buying the bag to put it in. I will post pictures, hopefully Saturday evening so that you can see the finished product after the big reveal.

Thursday, November 3, 2011

Get Your Math On

I have been so focused on my crafts that I have been neglecting my math. I have a meeting in a couple weeks for which I need to answer and analyze 95 math problems. For those of you that don't know me, I have a 4 year math degree, and I love math(well parts of it), so this isn't as torturous for me as it might be for some of you. However, it is still going to take some time. I haven't exercised my math muscles in a while. We'll see how it goes. I'm off to get my math on.

Tuesday, November 1, 2011

Sneak Peak

Here is a project I am working on for a baby shower in a couple weeks. I don't want to give it away, but here are some snippets.


Monday, October 31, 2011

Happy Halloween

This weekend I carved a pumpkin with my friend Sarah over at Ya-Ya's Kitchen. I haven't carved pumpkins in a number of years. It was lots of fun. We looked online for inspiration. 

First we drew the designs on.


Then we cleaned out the pumpkins.


Next we began to cut.

Here's the final product.


I think our pumpkins go together perfectly.

Friday, October 28, 2011

Update

Well, it`s been a week and I really don`t have anything to say. My parents are in Hawaii, and we are staying between their place and our place. I have a few different projects on the go right now. The main one is a quilt that I am working on with my mom. It`s in the frames at my parent`s place right now. I am working on it mornings and evenings when I`m not at work. I have no pictures for you because my parents took my camera to Hawaii with them. That`s right, my camera got to go to Hawaii but I didn`t.

In other news my sewing machine is in for repairs :(. My feed dogs are broken. I think that is the funniest part of a sewing machine. It went in a week and a half ago and I haven`t heard anything from them.

Thursday, October 20, 2011

Numero Uno

Well, here it is. My first post. I have been thinking for a while(probably two years) about starting a blog. I just couldn't figure out what I would post about, or how I would keep it up between school work and procrastination. But I'm taking the plunge. This is it. There's no turning back. I still don't know what exactly I'm going to post about, but between being done school and only having a part-time job I at least have time to post.
I am hoping this blog will help me stay in touch with old friends, make new friends and document my projects better. You'll have to bare with me as I figure out what exactly it is I am going to share here.