Monday, March 12, 2012

Quiet Book: Page 5

That takes us to the barn page. I think this one might be my favourite. It is so super cute. I can say that because this is the only page I used a template on.  I started with this template from homemandebyjill. I modified it slightly to suite my needs/likes, but I really have to give her credit.


The barn I cut out as one big shape. I then cut a T-shape in it to make the doors. I zig-zagged around the outside of the barn. I used brown ribbon to go around the roof, and felt for the window pieces. The ribbon I attached with a straight stitch, and made sure to zig-zag across the loose ends. I made the mistake of putting the white x's(that is a lot easier to say then to try and spell out) after the fact. It was difficult to maneuver and also to make sure I was stitching where I wanted to be. I don't remember what the white on the barn doors was. It came out of my stash. It was wider than I wanted, so I folded it in half and stitched it down before attaching it to the barn. Getting the corners to do what I wanted was a little difficult.


And you haven't even seen the best part yet....


...the occupants of the barn.

There's a chicken,
a pig, 
and a cow.
And they're finger puppets!!!!!!!!!
I grew up with felt finger puppets. I remember having the three little pigs and other fairy tales, so I was so excited when I found this template. I hand stitched on the extras(noses/beaks and spots) but machine stitched the outline with the extras(ears/comb) in between the two layers. I was super happy with how these turned out. They were the first machine stitching I did on the book. The eyes are made with french knots. I did not bother to use the template for the puppets. I traced around my hand for the general shape, and decided that all the other pieces were so small that I didn't bother. This time I made the pocket out of cotton. It definitely helps with getting the puppets in and out, but the back of the pocket is still pellon. I wish I had more to say, because I just want to keep talking about this page...that's how much I love it. Perhaps I will have to do some finger puppets just for fun.

Thursday, March 8, 2012

Quiet Book: Page Four

The next page I'm showcasing is the vegetable page. It doesn't really have a good name(as you can tell). I wanted a page with pockets of some sort. Originally I saw a page with two little beds, and dolls that tucked in and out of bed. That sparked my interest, but I wanted to do something different. I came up with the idea of having pockets, with things coming in and out of them. I decided on various fruits/vegetables. You'll see why with the next page.


This page was a little complicated. I don't know that I'm fully happy with how it turned out, but I will explain it to you anyways. Because the objects are made of felt, and I also made the pockets out of felt, things don't really slide in and out. Next time I would either line the pockets, or make them out of cotton or something else.

Again, I cut out two of each shape, and sewed them together to give a sturdier object. I  hand sewed them together because they were small and odd shapes and I don't trust myself with a sewing machine - not for work like that. Sometime I used embroidery thread and sometimes I used regular thread, it just depended on colours I needed. I got into a good rhythm of stitching. I only did half a stitch(an up or a down) at a time, as I needed to make sure it came out in the right spot on both sides. I would go around the shape twice. The first time I made regular stitches, and the second time I would fill in the gaps. (So where I had gone up, I would go down, and where I had gone down I would go up). I feel like I am not good at explaining it, and I didn't take any pictures, so you'll just have to guess. As I made each object I attached a ribbon to it, that I later attached to the page. I had some trouble with the stitching staying in the ribbon, so as you'll see I made it really ugly to make sure it would stay.  I always made sure to sandwich it in between the two layers, so to disguise the ugliness.


Of course, it couldn't just be a page with pockets. It had to be more than that, so each pocket has an increasing number of items in it.

One apple.


Two ears of corn.


Three carrots.


Four pea pods. (They're my favourite)

Saturday, March 3, 2012

Quiet Book: Page Three

Next up we have the shoe. This page has two purposes: one is to practice tying a shoe, and the other is to practice lacing. The pictures I looked at for inspiration had the shoe facing the other way, with the toe of the show at the bottom of the page. However, I faced my shoe this way, because that's the way a shoe faces when you are tying it on your own foot. The things I thought about when making this book even astound me sometimes.

Sorry about the blurry photo

This one was a little trickier, and took some though as to what order things needed to be attached in. First of all, I wasn't sure about making the holes for the laces. In a lot of the pictures I looked at people had used eyelets, but I didn't have an eyelet tool, and I didn't want this to turn into a really expensive project. I began experimenting with hole punching the felt, but there was no reinforcement around the hole, and it was so close to the edge, that it was easy to rip. I also tried making an eyelet on my sewing machine. Again, it really wasn't as strong as I would like. Enter Walmart. They had a package of 36 eyelets, with the tools you needed for $2. I figured I would try it. It came with the eyelets, a tool for punching a hole to put the eyelet in, and a tool for flattening the back of the eyelet once it's through the hole. It worked surprisingly well for $2. I did have some trouble with the hole punching part on the felt, so I just used the one that came with my sewing machine. The only thing I had to provide was a hammer(have 3 of those) and a hard surface. Note: your dinning room table is not a hard surface(I learned that the hard way). I ended up using my kitchen countertop. You also may want a time when no one is around, because the banging can be a little loud. Note: this is not a craft to do while your child is napping(I did not learn that the hard way). I did have one casualty when putting in the eyelets from pounding a little too long (see top left eyelet in picture below).


The eyelets do leave a bit of a rough edge on the back, where they fold over, so I did two layers of felt, each with eyelets that lined up, and then sewed them together so that the rough edges of each were facing in. The difficulty I had in this was that the eyelets make the felt thicker, and because they were so close to the edge, I had trouble sewing around them. I would probably move them around more next time.


Here's a picture of the inside of the shoe. I did not sew the tongue down all the way around, so that it would more resemble a shoe. Also, my tongue is a little crooked. The shoelace I got from my father's stash. I chose one that was the right length to lace up and still have plenty to tie. It ended up being longer then I initially thought it would need to be in order to do that. It didn't have a partner so I didn't feel bad stealing it. My mom suggested that I tack the shoelace down in the middle at the bottom of where it laces up, so that you could still lace the shoe, but so that the shoelace couldn't come out and get lost. I forgot. Also, I apparently can't measure as well as I thought I could because originally I designed the shoe to go straight up and down, but it wouldn't fit on the page, which is why it's on an angle.

Friday, March 2, 2012

Quiet Book: Page 2

So, as I am starting to write this I realized that I don't remember the page order of my book. I reorganized all of the pictures and put them in folders, so your guess is as good as mine. I guess I will just make it up.

This page is an analog clock. I know this is something I struggled with as a child. It still gets me sometimes if I don't take enough time to think about it.


This was a fairly easy page to make as there weren't many steps involved.  I first decided how big I wanted the outer circle to be, and then decided how big I wanted the numbers to be, which then made my decision for how big the inner circle would be. I then got out my compass, made templates of the two circles and then cut them out. As with everything, I made a paper template, and then pinned it to the felt and cut it out. The colours I chose for the clock were mostly determined by which colours I had enough of.

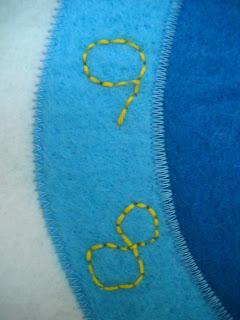
I hand stitched each of the numbers on, and did not use any sort of template. I just eyeballed it for what the numbers looked like and how they were spaced. I ended up redoing the number three at least once, and there is some spacing that I'm not quite happy with, and some numbers that are a little crooked for my liking. I'm wasn't sure what I could do differently, but then I saw on futuregirl that she traces onto stabilizer, stitches and then carefully removes the stabilizer. Perhaps another time.


The hands took a couple attempts as well. At first I cut them out of felt and then attached them with a brad. I even remembered to attach them with the brad before I sewed the clock to the page! However, felt on felt is not a good idea. It does not rotate, which is kind of an important feature of the hands of the clock. I then tried putting washers between the layers in order to separate the felt, but it really didn't help much. Finally I dug through my recycling bin and pulled out the lid of a margarine dish (don't worry I washed it). I was worried that the edges might be too sharp, but I rounded all of the corners and it was fine. Plus they moved! All that was left was to zig-zag the clock to the page. Overall I was very happy with the page.