Saturday, November 23, 2013

Inspiration

I have been following the Canadian Blogathon this week, put on by SewSisters, and it has inspired me to get back to my blog. (That and the guilt of my gramma telling me I don't blog enough). I have a friend coming over this afternoon so that we can craft together, but I thought since I have a little time, I would go ahead and post my latest project.

It started as a shoe box full of "squares" that I inherited from a quilter who retired. (I still maintain that's the best way to grow your fabric stash). I decided that I should do something useful with them, so my friend and I set to work. We scoured pinterest, and other sites, looking for quilts that made good use of small squares. (by the way I put squares in quotations earlier because they were mostly rectangles with sides ranging in length from 3 1/4 to 4 inches...I'm not sure what project they were originally intended for, but apparently uniformity didn't matter). Once we picked out a few ideas that we liked, we got out my shoe box and began sorting. At first I thought it was going to be a lost cause. I had a hard time finding a quilt out of all of the incoherent squares. But we just starting playing, and we managed to come up with something that worked.


We did a basic nine patch with coloured squares around the outside and a white square in the middle. We made both blue and brown squares. We tried not to over think things, or worry if colours matched perfectly. Once we had our blocks laid out we had to square up all the "squares". We ended up working with a 3 1/4" square since that was the lowest common denominator among all the squares we chose. After that it was just a matter of stitching things together.


I puttered away at it whenever I had some spare time (side note: it is so nice to have a craft room and not have to set up and take down from the dinning room every time I want to craft). I used some other inherited fabric for the sashing, and since I'm not really one for square quilts, I made the sashing between the rows half the size of the sashing between the columns.


I didn't just want to alternate blue and brown squares, so I played around and came up with this layout (I have a hard time letting go of symmetry). Once it was all put together I gave it to a friend to machine quilt. She asked how I wanted it quilted, but I am still stuck in a hand-quilting mind set and had a hard time thinking outside those confines, so I left it up to her. Less than a week later she returned it looking like this:

She quilted nested squares inside the nine patches, and in the sashing she quilted bubbles. I love it. Thanks Marg for your hard work and creativity!


I attached the binding and it was done. I had decided when I started the project that since the fabric was all free to me, I would give back and donate it to Project Linus. I hope it helps someone when they need it, and that they enjoy it as much as I enjoyed making it.

Wednesday, April 17, 2013

Quiet Book: Page Ten (Last One)

This my friends is the last page I made in my quiet book. It was a fun one, and probably involved the most creativity/the one I made up the most.

I made the head and facial features out of felt like the rest of the pages. The neck/face I zig-zagged on like usual. For the facial features I used a blanket stitch (which I did before the face got zig-zagged onto the page). 


The hair I made by cutting pieces of yarn. I attached it in three places (with my machine): the middle, and also off to the sides (so her hair wouldn't fall in her face.


I used a piece of ribbon that I stitched to one end of the page, and attached at the other end with the standard velcro protocol (fuzzy side on the page, scratchy side off the page). However, I wish I had done this one the other way around. When you are trying to get the hair elastics off, they stick to the velcro, and since the ribbon will always stay in place (it doesn't completely detach), I didn't need to worry about the scratchy side of the velcro being exposed.

Along with the hair elastics, I included a few clips as well (but ones that were fairly flat so that the book could still close well).


I even did her hair for her when I was done.

Sunday, April 14, 2013

Quiet Book: Page Nine

The next page I want to show you is my abacus page. Since I have a math degree, I felt I couldn't make a quiet book without including some sort of math. I chose to do a sort of abacus.


I used the thin green ribbon I had used on a few other pages, with pony beads strung on it, and then laid a thicker black ribbon across the ends, and stitched it down. Beside each of the "rungs" of the abacus I put the numbers with velcro attached.


Again I put the "fuzzy" side of the velcro on the page, and the "scratchy" side of the velcro on the piece that detached. I also made used two pieces of felt for each number. I sewed the velcro onto one (with interfacing on the other side, and I hand stitched the numbers to the other pieces. Then I stitched them together.


This was the only page where I repeated an attachment method. I had run out of methods and really wanted to do this page, plus my book needed another page, so I repeated, but I felt like it was different enough (matching numbers rather than colours). I also made the colours of the numbers alternate, so even if they weren't matching the numbers, they could do an a-b-a-b pattern.

Saturday, April 13, 2013

Quiet Book: Page Eight

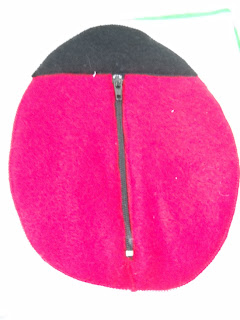
The next page I did was the ladybug page. It was the one I remember most from quiet books from my childhood. The pictures aren't great, so you'll have to bear with me.

The ladybug has a zipper in it. The zipper I got from an old pair of pants. I needed a fairly short one so that the ladybug could fit on the page. This was my first zipper, so I was a little unsure about what I was doing, but I attached the zipper first, and then everything else, so I think it was a little easier.


Inside the pocket were black dots to go on the outside of the ladybug. Because everything was felt, I didn't worry about a way to stick the dots to the outside of the ladybug. That way where they went wasn't dictated.


This was probably one of the easier pages...not too many pieces, or things to attach. I put the zipper in the red piece, after I cut a sliver out of the middle to make room for it, then I attached the red piece to the page, and then the black piece on top of that.

Only two more pages to go, plus putting it altogether. Thanks for following along.

Thursday, April 11, 2013

Quiet Book: Page Seven

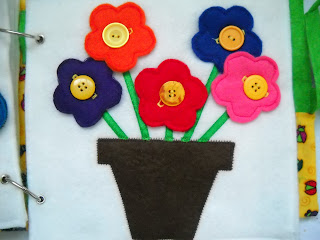
The next page I did was a flowers page. The focus of this page was the buttons.


For each flower I cut out two shapes out of the felt, and one out of the interfacing. I don't recall if I straight-stitched around the edges first, and then did the button hole, or did the button hole first. I do remember the button hole was a little tricky since there were multiple layers, and they would move around a bit.


I stitched the flower pot on before the stems, but if I were to do it again, I would do the stems first, or at least leave the top of the flower pot until after the stems, because then it would cover up the ends. I zig-zagged the flower pot on, and straight-stitched down the sides of the ribbon that I used for the stems.
The buttons I hand stitched on. I went through my button stash, and two other friends as well, to find buttons that were the same size, so the buttonholes could be all the same size, and it wouldn't matter which flower went where. After that I just had to button the flowers on to the page.


Tuesday, April 9, 2013

Quiet Book: Page Six?

My grandparents were visiting for the weekend, and it was really nice to see them, except I got in trouble from my gramma for not posting enough on my blog. I have a project I am working on right now, but I haven't photographed it, so I thought I'd go back to finish posting about my quiet book. It's been so long since I made it, or posted about it, that I have forgotten the order of the pages, so let's just pretend that this was the next page in the book.


The focus of this page was colours. The balloons attach by velcro. I again had to think through what needed to be attached when. For each colour, I cut out three identical balloons. To one, I attached the loop (or soft) side of the velcro, and then zig-zagged it to the page. This was so that if it did not have the other part of the balloon attached to it, it wouldn't be rough, or stick to the other page. With the other two balloons, I attached the hook (or scratchy) side of the velcro to one (with interfacing on the underside), and then straight stitched the so-far untouched balloon to the other side, in order to cover up the stitching from attaching the velcro.


After that, all I had to do was to make the strings. I hand-embroidered them with black thread. I think that is really all there is to say about them.


So, there you go gramma. It's not a new project, but it's a new post. I think I still have four more pages to post about. Hopefully it won't take so long for me to post next time.

Saturday, February 23, 2013

Ready for Winter

I finally finished the hat and mitts I decided to make myself in November.


I got the pattern free from Redheart.com. It is called Lacy Leaf. They have the pattern listed twice. It is labelled as an easy pattern and calls for 1 ball of Redheart Super Soft. It is also labelled as an intermediate pattern and calls for 2 balls of Redheart Super Soft. Since it only took me one ball, and not too much assistance I would go with the first option (although the pattern information is exactly the same on both so it really doesn't matter). The pattern description calls it "Super Soft", but it's really just called "Soft". I used the seafoam colour.


The mitts have a cuff that matches the pattern in the hat. It called for 3 rounds of the pattern, but I don't like huge cuffs, so I only did 2. It also called for the mitt to be 7 inches before making the slit for the thumb. Because I shortened the cuff, I just held it up to my hand to decide when to make the thumb (I think it was about 4.5 inches).

The hat also tells you to start on a circular needle and then switch to double pointed needles. I tried that, but I don't think my circular needle was the right size (circumference wise) and I had some trouble, so I just used the double pointed needles the whole time, which worked out fine.


This was only my second non-flat knitting project, and overall I am very pleased with it. I have an extra skein of the yarn (I bought 2 just in case...since the patterns didn't agree) that I need to find a new project for. Oh yeah, and I'm all ready for winter now.

Sunday, February 17, 2013

I'm a Seamstress!

Well, it's official. I've made my first piece of clothing. Well real clothing. I previously made my husband some pajama pants, but since they involved about 3 straight seams and nothing else, I don't think they count.


I followed this tutorial from Sew Dang Cute. It was super easy (minus the fight I had with the zipper...and the iron...and running out of thread). The only part I did differently was to skip the tulle at the bottom (I'm really not a tulle person).

I bought the fabric at Jo-Anns. My mom made me do the wrinkle test before I bought it (which involves squeezing the fabric in your hand and letting go and seeing how wrinkly it is). There was a cute grey fabric I liked but it didn't pass the wrinkle test. I figured tan is a good choice...goes with a lot. It cost me less than $20. Wardrobe win!


I wouldn't say it fits like a glove (the waistband could use some help...and definitely needs a hook and eye), but for my first piece of clothing I am very happy with it. I wore it to church this morning (although bare legs and -11 are not a good combination), and plan to wear it on Wednesday when I am back in my office next.

That makes two projects I finished this weekend...I'm on a roll. I might even get back into this blogging thing.